


Cropping is one of those powerful post-processing essentials that can help your photography really take off. It can draw the viewer's attention to specific areas of a photo, it can help remove of unwanted elements of the photo, or even create unique end results from the same photo by using different cropping techniques! Even if you are a purist that believes that what is obtained from the camera is exactly what should be retained, take a moment to think again. Magazines have been cropping photos even before the digital sensor was invented and no serious photographer can live a satisfactory life without the crop tool. I even use cropping on my screenshots for this article to properly illustrate how to use the crop tool!
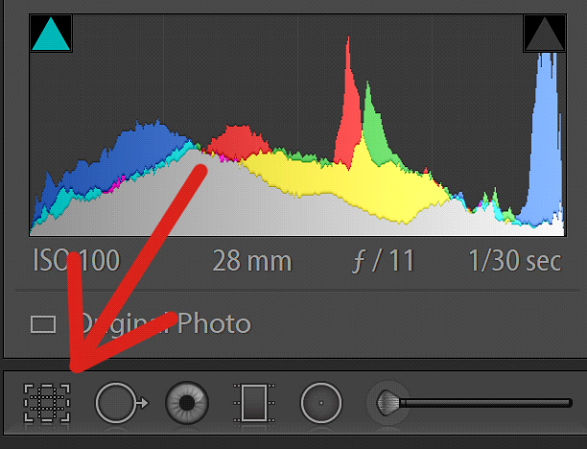
Lightroom has an amazing crop tool that is simple, fast and customizable. It is accessed by clicking the crop icon at the very left position of the toolbox in the Develop module.
To work efficiently, press "R" on your keyboard. It is one the most essential Lightroom shortcuts and even works from the Library module. From wherever we start, pressing "R" brings us to crop mode within the Develop module, with two interface changes taking place:
- The photo is surrounded by a crop frame with handy handles on all four photo corners and the middle of all four photo sides.
- The crop menu appears below the toolbox, with all Develop module panels remaining functional immediately below.

The crop menu itself is divided in the Aspect, Angle and Constrain sections:
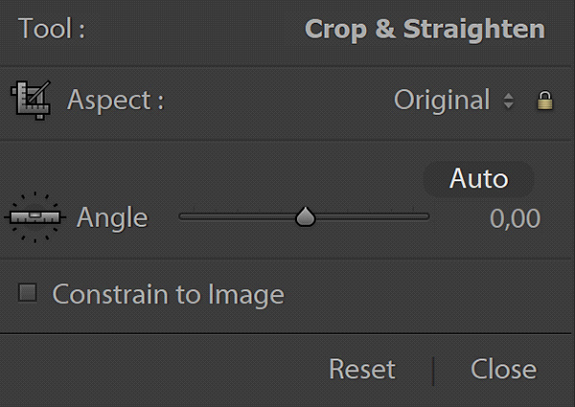
Let's see what each section does.
Aspect
The side ratio of the crop is the most important parameter. Bear in mind that different clients, websites or publications demand specific ratios. Aspect is determined by the popup menu accessed from the small arrows exactly to the left of the lock sign:

A closed lock indicates that any changes will be done within the bounds of the chosen ratio. If the ratio you look for is not available, you can always go to the "Enter Custom..." option and enter a new one that will appear from now on as an option in the ratio list:

Angle
There are different ways to rotate the image to get to a satisfactory crop. The slider in this section will do just that, but the easiest way to free rotate the image is to hover the mouse pointer just outside the crop frame. When we do that it takes the shape of a bidirectional-curved arrow. By clicking and dragging in the desired direction we can rotate while the crop frame automatically stays within the image's bounds:

The yellow Angle tool at the left of the section is the level tool. It comes very handy if you want to align the rotation to a certain horizontal or vertical line. It works great for sea and lake photos where it can be pretty hard to nail a "horizontal" horizon in the first place. Just click on the tool (the mouse pointer takes the shape of a spirit level), click at the start point of your reference line and drag to the end point. The example below demonstrates what can be achieved:


I never use the Auto option, as I like to precisely control and align my crops.
Constrain
By clicking the "Constrain to Image" box we ensure that no matter how we transform our image, the end crop will always stay within its bounds.
If you want to adjust the crop, grab any point on its boundary and move inwards/outwards or rotate as explained above. If the lock in the Aspect section is closed, changes will happen in such a way that the initial shape will always be retained. By clicking the lock and "opening" it, ratio limitations no longer apply and changes take a more freeform approach.
We can press "X" on the keyboard to switch between portrait and landscape orientations of the crop tool. This is the second crop related shortcut that will make life much easier. One good example is when we want to crop a portrait of a person out of a landscape oriented photo. The reset button at the menu's bottom will revert to the initial state when the crop tool was first selected.
By default, the crop area contains two vertical plus two horizontal faint lines that refer to the rule of thirds and act as a helpful guide for our crops. If you are unhappy with this arrangement, press "O" to cycle through the different available guide patterns or to switch them off altogether.
Yet another crop feature of the crop tool is the ability to semi-darken or completely blacken out crop surroundings. Pressing "L" once will darken everything but the crop area, so that we can clearly see what the end result will be:

If you prefer an even more isolated view mode, pressing "L" once again will completely blacken out the surroundings.

One more press brings back the normal view.
Cropping is incredibly versatile. Starting from the same photo we can produce completely different end results. To demonstrate the possibilities I showcase below five different crops of a couple on a train:
- Original 3:2 ratio that includes an out-of-focus view of the primary shooter/photographer on the left which monopolizes the majority of the image.

- Tighter 4:3 ratio without the photographer on the left provides a more focused view of the couple.

- Square 1:1 ratio that still retains some of the metal for framing, while pulling closer to the subjects.
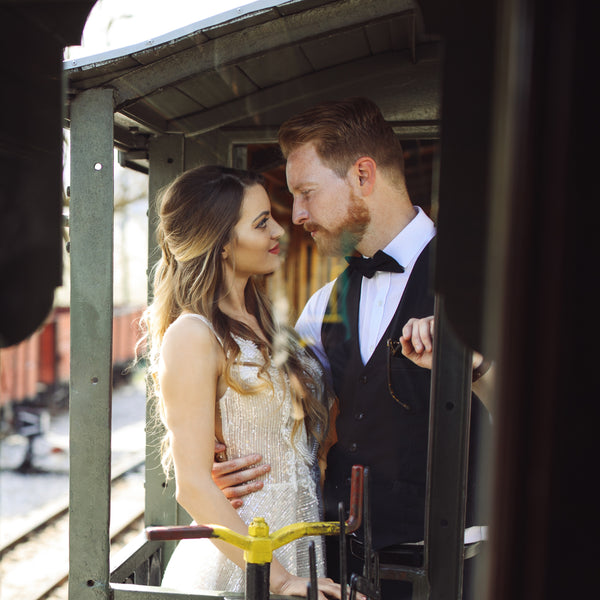
- Free crop ratio selected so that framing can be squared off with some minor rotation bringing more balance to the image overall.

- Tight vertical 2:3 crop creates a clear intimate full view of the couple while limiting most of the framing or visual distractions.

Every one of these five photos is different in its own way something that I hope demonstrates the power of Lightroom's crop tool and the necessity to practice and master its use. Whenever you are in a hurry, cropping and some quick editing in the basic panel are enough for some fantastic results.


